Create in the browser
Arrange scenes, add assets and set up interactions in Zimension.



 Unity
Download the Unity template, export your Zimension project as a ZIP, and import it from the Zimension menu in Unity.
Setting up Quest VR? View XR instructions
Version 0.3.11 · Unity 6000.6.8f1 · Premium required
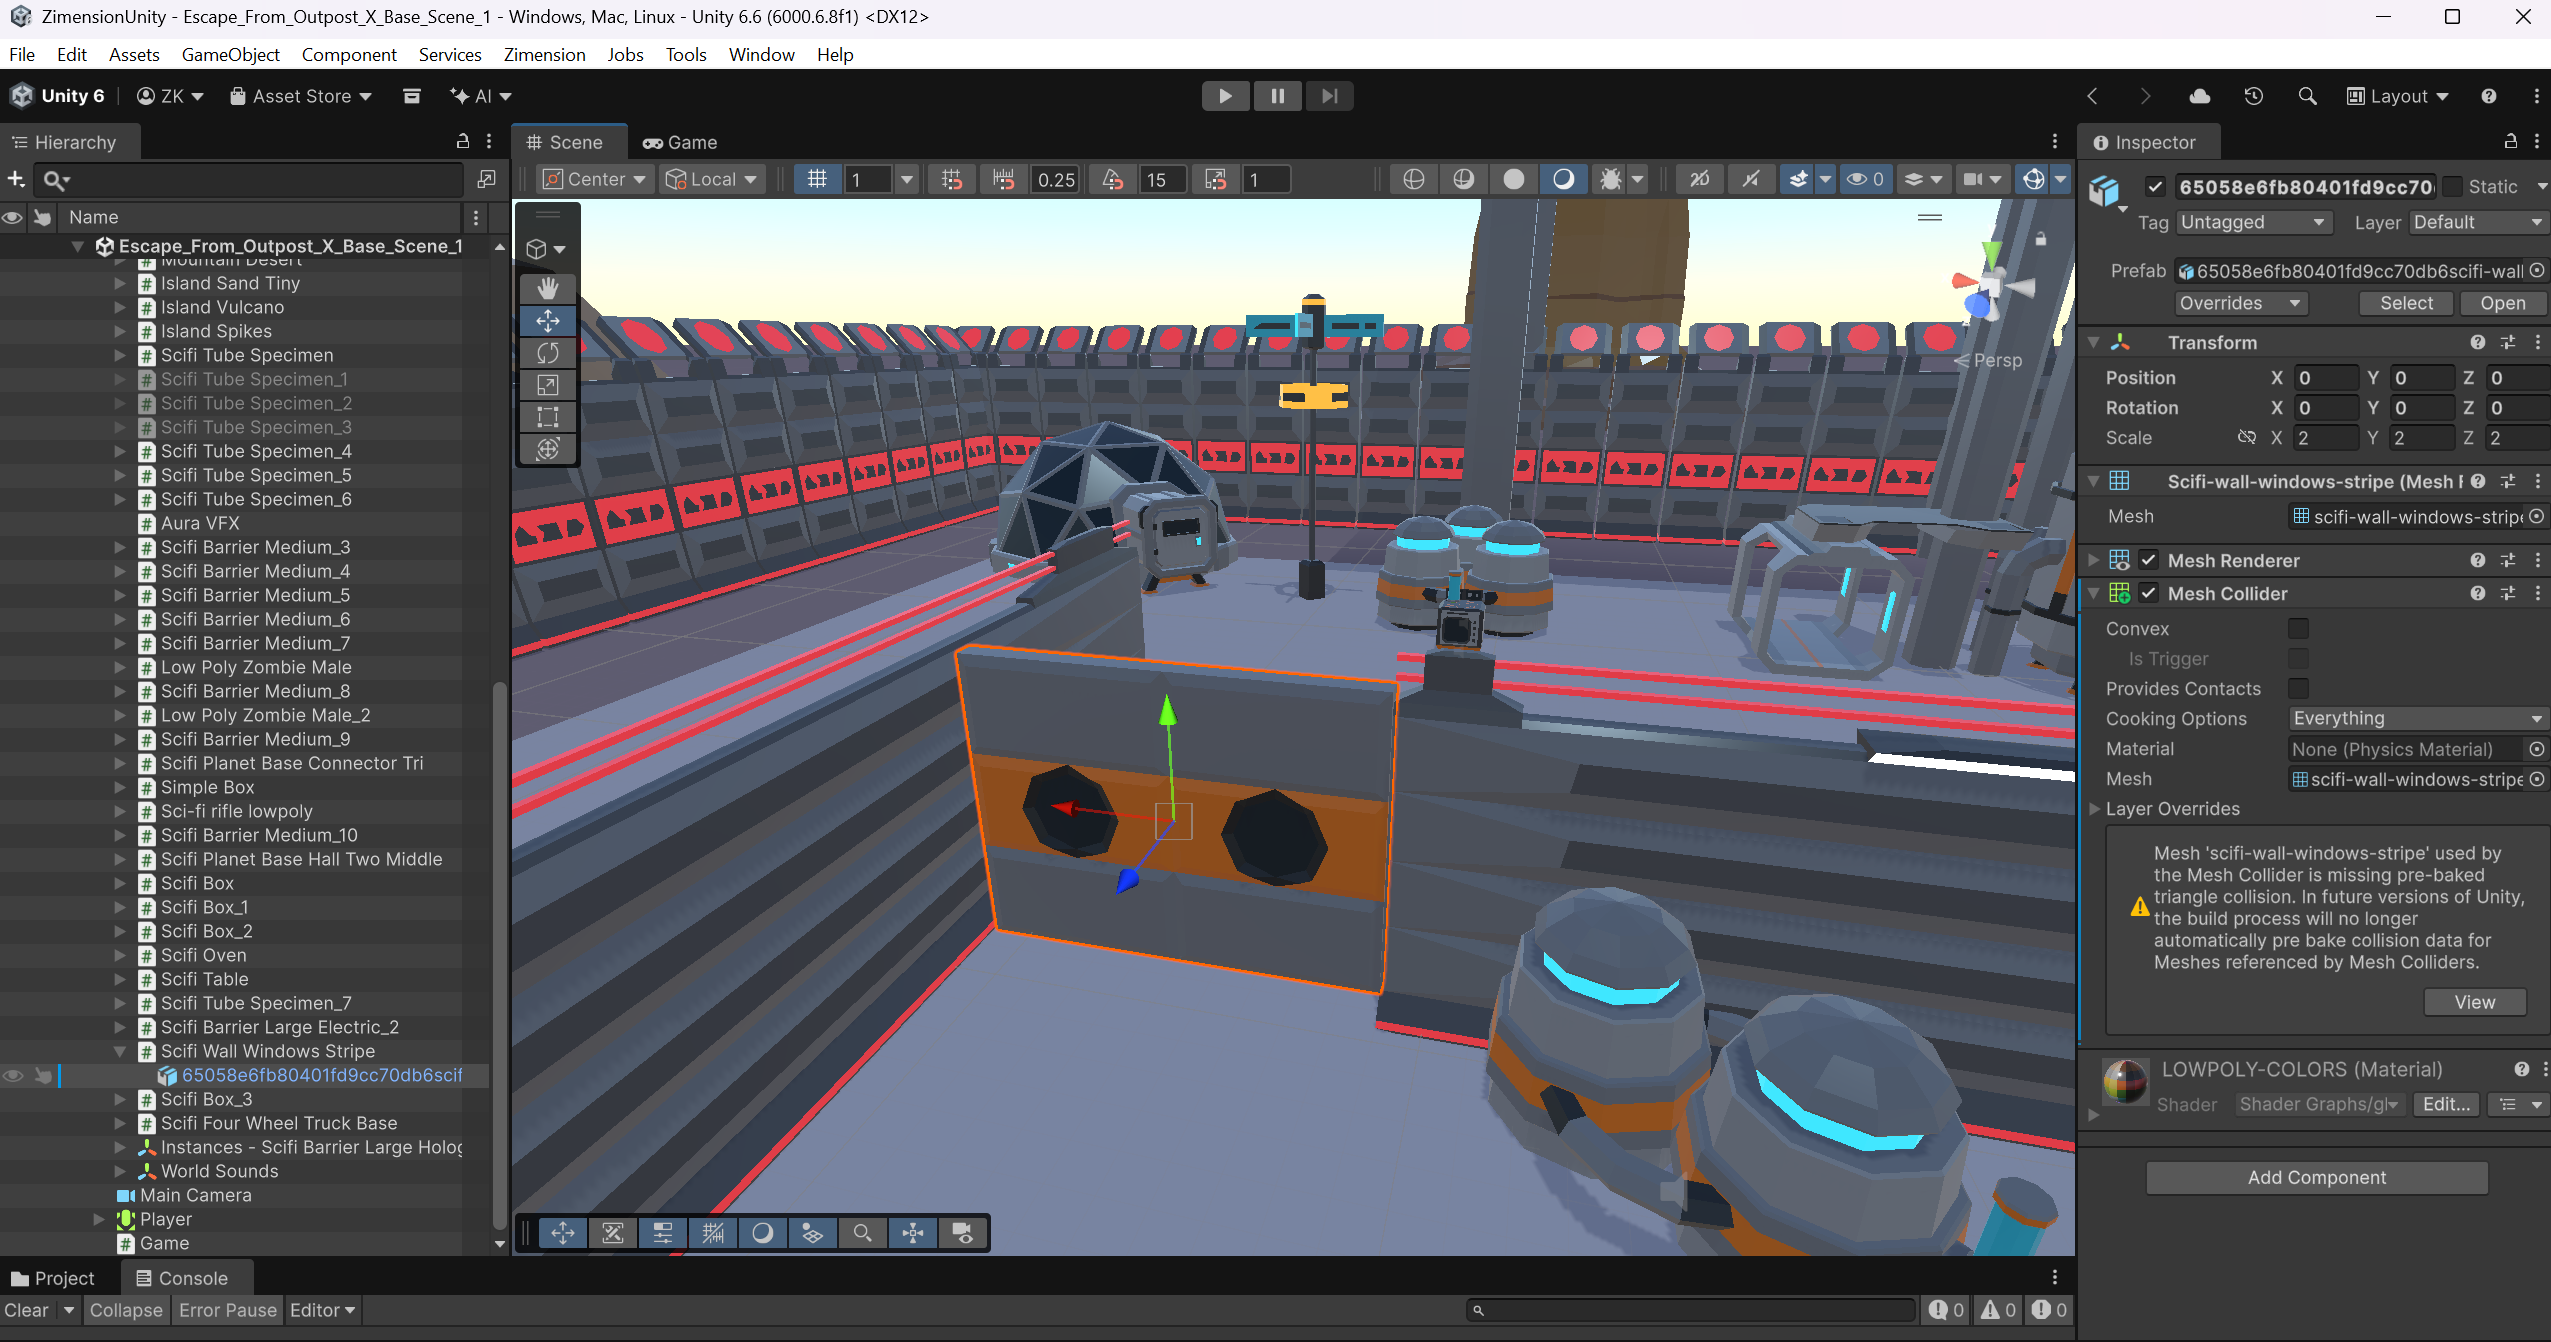
Use the browser editor to create your project, then work with its imported scenes and scripts in Unity.
Arrange scenes, add assets and set up interactions in Zimension.
Supported events become C# methods. Add your own scripts and Unity components.
Export a new project ZIP when your Zimension project changes. Keep custom Unity work in the preserved files.
Install what your target needs. The template handles project packages; Unity Hub handles the editor and Android build tools.
| Your target | What you need |
|---|---|
| Every project | An active Zimension Premium plan or higher, Unity Hub, Unity Editor 6000.6.8f1, and your saved project export ZIP. Internet is needed for first-time package installation. |
| Desktop game | Add build support for your desktop target in Unity Hub. Android tools and a headset are not needed for desktop-only projects. |
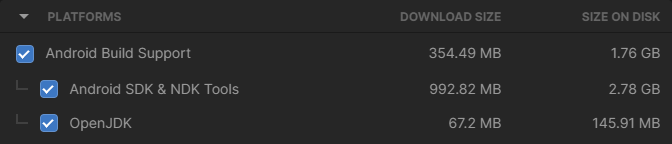
| Quest / Android APK | Unity Hub > Installs > 6000.6.8f1 > Add modules: Android Build Support, Android SDK & NDK Tools, and OpenJDK. Finish every queued download and restart Unity. |
| VR preview in Play | A supported Quest with controllers and Meta Horizon Link on a compatible Windows PC. Select Meta as the active OpenXR runtime and launch Quest Link inside the headset before pressing Play. |
| Installed by the template | Rendering and asset-import packages, plus OpenXR, XR Plug-in Management, Input System and XR Interaction Toolkit for VR. Let Unity finish resolving packages and compiling; accept the install prompt if shown. |
Android Studio is not required for this Unity workflow. Use the SDK, NDK and OpenJDK supplied by Unity Hub. If Unity cannot find them, open Preferences > External Tools and check the tools installed with Unity.
 ZimensionUnity-0.3.11.zip — Unity template
Export your project from Zimension, then open it in the Unity template.
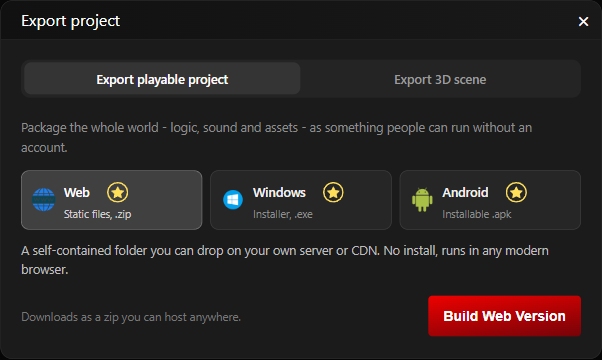
Open your project in the browser editor and save your changes. Open the Publish panel and choose Export, then select Export playable project and Web. Click Build Web Version to download the project ZIP with its assets.
Keep this project ZIP intact. You will select it inside Unity; it is different from the Unity template downloaded above. Export permissions and your project’s asset restrictions still apply.
Find ZimensionUnity-0.3.11.zip, the template downloaded using the button above. This gives Unity the importer; your own project export is a separate file.
Windows: right-click ZimensionUnity-0.3.11.zip, choose Extract All…, choose a writable location and click Extract.
macOS: double-click ZimensionUnity-0.3.11.zip to extract it.
Open the extracted folder and find ZimensionUnity. If your extraction tool created an outer folder with the version number, open that folder first.
Extract the Unity template only. Keep the project ZIP from step 1 intact for step 6.
Open the Unity Hub application. You are adding the project you just extracted.
ProjectsAdd ▾Add project from disk
Use Add, not New project. You already have the Unity project in the downloaded template.
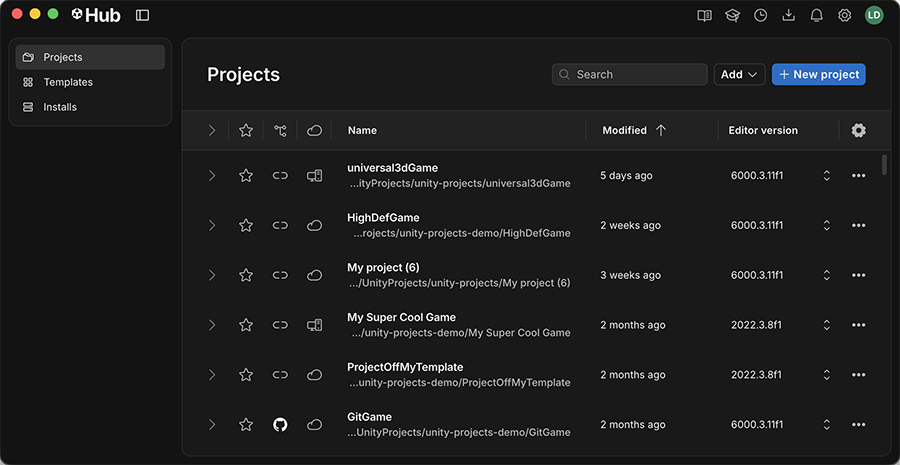
In the folder picker, navigate to the extracted template. Select the ZimensionUnity folder that directly contains all three folders: Assets, Packages and ProjectSettings.
Folder names alone can be similar. The three folders inside are the check that you have selected the right project root.
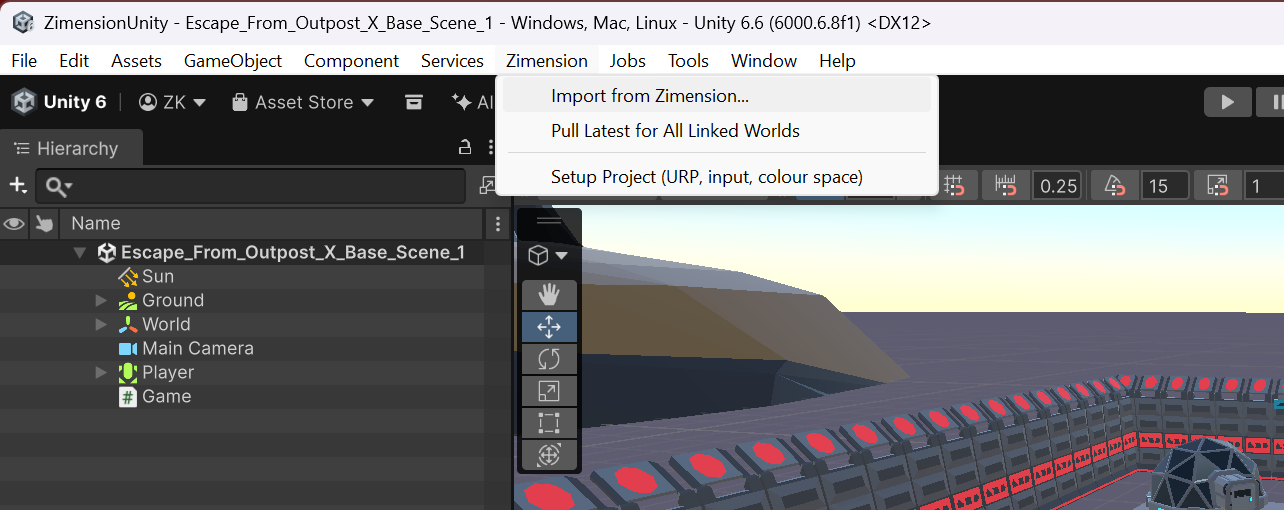
Use the menu bar in the Unity Editor window, rather than Unity Hub. Click Zimension, then Import from Zimension… to open the importer.
If the Zimension menu has not appeared, let the first-time package installation and compilation finish. Make sure you opened the template project from step 4.
ZimensionImport from Zimension…
In the Zimension Import window, use the From a file tab. Choose the ZIP exported from your own Zimension project in step 1.
From a fileZip…Your project export.zipImport project
Select your project ZIP here, not ZimensionUnity-0.3.11.zip. Leave the project ZIP compressed: use Zip…, not Folder…. No hosted export link is needed.
Unity imports the models and audio, builds scenes and Animator Controllers, retargets compatible animations, and generates your project’s C# logic. Compilation can trigger an assembly reload.
Wait for the Console message Connected <Project>Logic in <scene>. Review export-report.json under Assets/Zimension/Generated/<Project> for missing assets, approximations and unsupported features.
Assets/Zimension/
├─ SourceAssets/<Project>/
├─ Generated/<Project>/
│  └─ export-report.json
├─ Scripts/<Project>/
│  ├─ <Project>Logic.Generated.cs
│  └─ <Project>Logic.cs
└─ UserContent/Open the generated base scene if it is not already open. Press Unity’s Play button, then click Play on the game’s start screen. Check your interactions, animation, audio, checkpoints and scene changes.
WASD moves; F interacts and enters vehicles; F or E exits; left mouse fires; right mouse aims; R reloads; E drops a weapon; Esc pauses. Build and test your target platform through Unity’s Build Profiles.
Place your own assets and scripts in Assets/Zimension/UserContent. Extend the separate <Project>Logic.cs partial class; reimport rewrites <Project>Logic.Generated.cs, generated scenes and controllers.
To bring in later Zimension changes, save, export a fresh project ZIP and import it into the same Unity project. Updates travel from Zimension to Unity; Unity edits do not sync back into the browser editor.
Understand reimporting and preserved filesOptional controller-based OpenXR support for Meta Quest 2, 3 and 3S, using the same Unity project.
Enable VR in the importer to set up a tracked headset and controllers with Zimension gameplay. The template includes the integration and hand assets; Unity downloads the required packages on first open.
Use Unity Editor 6000.6.8f1. In Unity Hub > Installs > this editor > Add modules, install Android Build Support, Android SDK & NDK Tools and OpenJDK. Wait for every queued download to finish, then restart Unity. These tools are installed once per computer; they cannot be bundled inside a project ZIP.
Download the current Unity template above, extract it and add its ZimensionUnity folder in Unity Hub as described in the main walkthrough. Let packages finish resolving and scripts compile. Open Zimension > Import from Zimension, tick Enable VR and choose Meta Quest. If prompted, approve Install VR packages and wait for compilation.
On From a file, choose your project export ZIP and click Import project. Keep this ZIP compressed; it is separate from the Unity template. The importer configures the headset/controller rig, Zimension hands, gameplay controls, supported HUD/menus and a Quest APK build profile. No scene-by-scene camera or controller wiring is required.
The importer shows Editor VR preview, Quest APK build and Headset & controllers separately. Expand Setup details for individual checks and setup tools if a row needs attention. Already imported your scene? With Play stopped, tick Enable VR and click Configure VR & open scene, then save the scene. Stop Play before changing setup or importing.
Install Meta Horizon Link on a compatible Windows PC. In its Settings > General, set Meta Horizon Link as the active OpenXR runtime. Connect your Quest by Link cable or Air Link and launch Quest Link inside the headset before entering Unity Play mode. A USB/ADB connection alone does not start PC VR. Disable Use XR Interaction Simulator in Scenes under Project Settings > XR Plug-in Management > XR Interaction Toolkit when testing real controllers.
Open the imported base scene. When Editor VR preview is ready, click Test VR in Play, then start the game using its menu. Confirm head tracking, both hands, movement, snap turning, grab/drop, firing and menu clicks. Head tracking should continue during pause or frozen controls. Live tracking checks are verified only while a native headset session is running; simulator checks do not count.
Stop Play. Enable developer mode and USB debugging for the Quest and approve the USB debugging prompt in the headset. In File > Build Profiles, select the generated Zimension Meta Quest APK profile and make it active. Confirm the imported scenes are included with the base scene first. Open XR Project Validation for the Android target, resolve required issues, select the connected headset and choose Build And Run.
Launch the installed app on Quest and check tracking height, both hands, sprint, collision, weapon pickup/firing, menus and scene changes. Quest Link preview runs on the PC; it does not certify the Android APK, headset frame rate or store readiness. Review export-report.json and test your own project before distributing it.
| Input | Action |
|---|---|
| Left stick | Head-relative movement |
| Hold left stick click while moving forward | Sprint, when allowed by the saved project settings |
| Right stick left/right | Snap turn; return the stick to centre between turns |
| Grip on either controller | Grab a nearby weapon or freely pickable prop; release to drop |
| Trigger on the weapon hand | Fire the held weapon |
| Trigger pointing at a menu button | Select UI; rays appear only for interactive UI |
| A / B | Jump / interact or enter a vehicle; grab-only items do not show a button pickup prompt |
| Y / left menu | Reload / pause or resume |
This initial XR scope covers controllers, movement/turning, basic interactions and weapons, plus supported native HUDs and menus. Hand tracking, advanced spatial constraints, two-handed weapons and full browser CSS/text entry are not included.
Some features convert directly, some use an approximation, and others need to be implemented in Unity.
| Feature | Conversion | What to expect |
|---|---|---|
| Scenes and assets | Converted | Unity scenes, glTF prefabs, materials, lights and terrain; source assets remain editable. |
| Events, variables and logic flows | Converted | Generated C# event methods, typed properties, conditions, switches and delayed calls. |
| Player and checkpoints | Converted | CharacterController, camera, health, spawn-point teleporting and checkpoint activation. |
| Animation and sound | Converted with limits | Animator Controllers, humanoid retargeting, baked transitions and AudioSources. |
| Weapons, vehicles and NPCs | Converted with limits | Kit components for gameplay; arcade vehicle handling and supported rifle/pistol poses. |
| Custom UI and cutscenes | Converted with limits | Nested HUDs, overlays, responsive placement, event bindings and camera sequences; complex CSS needs manual work. |
| Meta Quest controller VR | Optional setup | Enable VR during import for headset/controllers, movement, grabbing, weapons and supported HUD/menus. Device and APK testing are required. |
| Multiplayer | Manual work | Networking and voice are not recreated by native conversion. |
Check the import report for your own project, then read the full feature mapping and limitations.
Read about generated files, component methods, reimporting and troubleshooting.
Understand the Zimension-to-Unity ZIP workflow, native conversion, output folders and the difference between the template and your project export.
See which Zimension features become Unity components, which are approximated, and which need manual implementation in the native converter.
Extend generated Unity event methods, typed variables, local scopes and built-in game actions without editing files that reimport overwrites.
Find the native Kit components and public C# methods for player control, weapons, vehicles, checkpoints, HUD, health and game flow.
Understand generated Unity folders, preserved user code, source assets, one-way updates and how to upgrade the importer without losing custom work.
Resolve wrong ZIP selection, package setup, compilation and wiring issues, missing animations, oversized weapons, vehicle exit and unsupported features.
Yes. Upload a square project thumbnail of at least 1024 x 1024 pixels, then export your project and reimport it into the current Unity template. The importer generates desktop, Android and iOS app icons, using the build support installed in Unity. Unsuitable or missing thumbnails keep existing icons. Transparent images receive a white background. Loading and splash artwork are unchanged.
Yes. Sign in to your Zimension account, then the server checks for an active Premium, Pro or Enterprise subscription, or an eligible organization Premium seat. Free and expired plans see the Premium upgrade option. After subscribing, return to this page and check your subscription again to download. This requirement applies to the Zimension Unity template; Unity Hub and the Unity Editor are installed separately through Unity.
Yes. Create and save your project in Zimension, export its Web project ZIP, and import that ZIP using the Zimension Unity project. Supported scenes, assets, gameplay settings and events become editable Unity content. Check the feature mapping for conversion limits.
Extract ZimensionUnity-0.3.11.zip first. In Unity Hub, click Projects > Add > Add project from disk. Select the extracted ZimensionUnity folder that directly contains Assets, Packages and ProjectSettings, then confirm with Select Folder or Open. If your extraction tool made a versioned outer folder, go one level deeper. Open this project in Unity 6. In the Unity Editor, choose Zimension > Import from Zimension > From a file > Zip…, select your own project export ZIP, and click Import. Keep that project ZIP compressed; do not select the template ZIP in the importer.
Use Unity Editor 6000.6.8f1, matching the template's ProjectSettings/ProjectVersion.txt. Install that exact version through Unity Hub, along with build support for your target platform. Choosing a different Unity 6 version can trigger version-change prompts or package incompatibilities; do not suppress those warnings by editing the version file.
You can author supported gameplay with Zimension's visual events and logic. The importer generates readable C# methods and ordinary Unity components. You can then extend the project with C#, UnityEvents and your own assets.
No. The native converter supports scenes, events, players, animation, audio, custom HUDs, overlays and cutscenes, with limits. Nested UI positioning, centering and responsive row/column layouts are supported; complex browser CSS still needs manual work. Basic Meta Quest controller VR is optional in the importer; advanced XR, multiplayer and objectives still need separate work. Read the feature mapping and the import report before planning a release.
Yes. Export a new ZIP and import it into the same Unity project. Generated scenes, controllers and generated logic are rebuilt. Keep custom assets in Assets/Zimension/UserContent and code in the separate user partial-class file. This is a one-way workflow: Unity edits do not sync back to Zimension.
Yes. Test the converted project, review export-report.json, then use Unity's Build Profiles for your target platform. Windows is the first validated target. Other platforms and features require their own testing and any platform-specific setup.
No. The ZIP workflow works with the existing Web project export. The importer also contains a link downloader, but link import and Pull latest require the export-link backend to be available. Use From a file for this workflow.
Zimension AI
Docs assistant
How can I help?
Ask anything about Zimension docs
AI may make mistakes. Always verify with official docs.